What is AdaBoost? A Quick Overview
AdaBoost, short for Adaptive Boosting, is a powerful algorithm that’s designed to improve the accuracy of a model by combining several weak learners into a strong one.
Essentially, it’s all about “boosting” the performance of simpler models like decision trees or stumps.
In machine learning, sometimes individual models struggle to perform well on their own. But when you link many weak models together, as AdaBoost does, the collective power is often greater than the sum of the parts. It’s a fascinating concept that has revolutionized the way we approach classification tasks.
Despite its name, AdaBoost is surprisingly easy to understand once you break it down!
Why is AdaBoost So Popular in Machine Learning?
AdaBoost stands out because of its ability to enhance the accuracy of weak models. Its unique strength lies in how it focuses more on difficult data points that earlier models misclassified, essentially learning from its mistakes over time. This adaptive quality makes it a go-to choice for anyone working with structured data.
Another reason AdaBoost is so popular is that it works well with imbalanced datasets and can handle noisy data. And while other algorithms might need careful tuning, AdaBoost often performs decently with less manual intervention. This makes it a great out-of-the-box solution for many machine learning problems.
It’s no wonder you’ll find it used in industries ranging from finance to healthcare.
The Core Idea Behind AdaBoost: Boosting Weak Learners
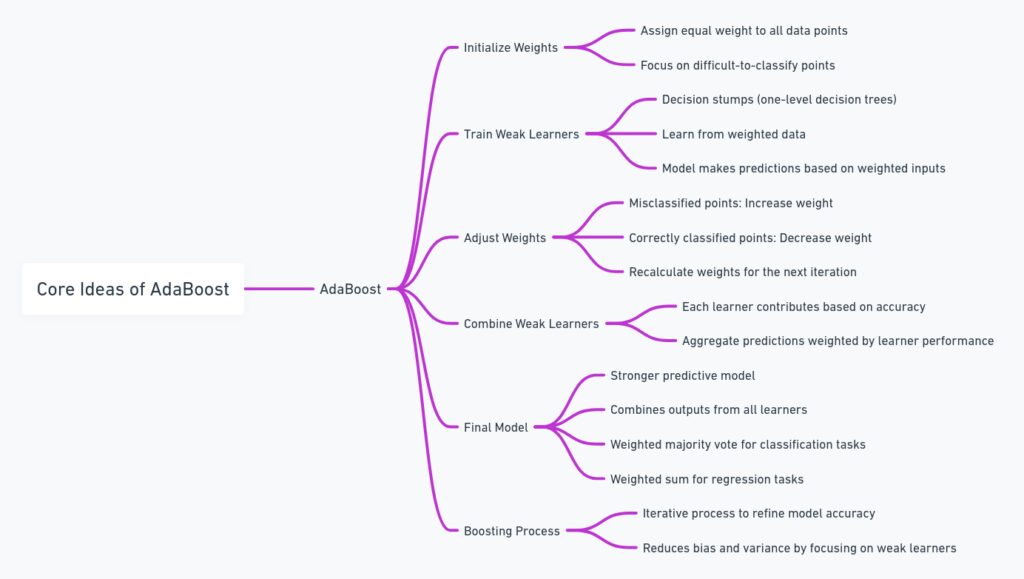
The concept of boosting is all about improving the performance of weak learners by strategically combining them. In the case of AdaBoost, weak learners are typically decision stumps, which are just one-level decision trees. Individually, they may not be impressive, but when they’re assembled together, they create a model with much better performance.

AdaBoost works in iterations. In each round, a new weak learner is trained, focusing on the data points that the previous ones failed to classify correctly. This targeted learning makes AdaBoost powerful in situations where certain patterns in data are hard to detect.
So, AdaBoost is less about creating one perfect model and more about building up layers of weak models that become stronger as a group.
Understanding Boosting: Turning Weak Models into Strong Ones
In the world of machine learning, boosting refers to the process of converting weak models into strong ones by combining them. AdaBoost is the pioneer of this approach. Each weak learner contributes slightly to the overall performance, and the algorithm fine-tunes its focus as it adds more learners.

Here’s an interesting fact: Boosting doesn’t just take any weak learner. It picks weak learners that minimize the weighted error—meaning those that can correctly classify the hardest cases. Think of it like a team of experts who each specialize in solving different kinds of problems, coming together to create a solution that’s hard to beat.
In essence, boosting is all about collaboration between models to get the best possible outcome.
How AdaBoost Builds a Series of Models
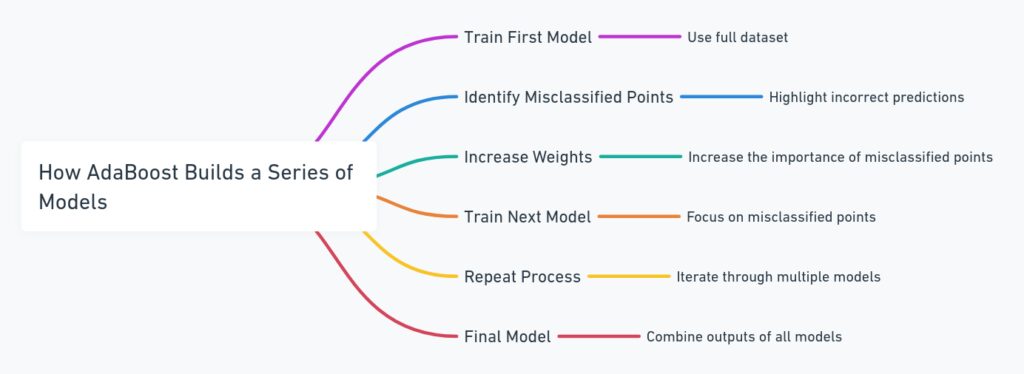
To really grasp how AdaBoost works, you need to understand that it builds a series of models, each learning from the mistakes of the one before it. The first model is trained on the full dataset, and if it misclassifies certain data points, AdaBoost increases their weight. This means that future models will focus more on getting those tricky points right.

Each iteration in AdaBoost adds a new weak learner that aims to correct the errors of its predecessors. The weighted error is key here, and the idea is that the total error of the combined models should decrease with each step.
By the end of the process, AdaBoost combines all these weak learners into a single strong classifier, which is often far more accurate than any one model in the series.
Weights and Misclassifications: How AdaBoost Adjusts
One of the most intriguing aspects of AdaBoost is how it adjusts the importance of each data point as it goes through iterations. After each weak learner is trained, the algorithm checks which data points were misclassified. The key innovation here is that AdaBoost doesn’t treat every mistake equally.
When a weak model misclassifies a point, AdaBoost increases the weight of that point, making it more important in the next round. This means future models will pay more attention to these hard-to-classify examples. On the flip side, data points that are classified correctly see their weights reduced, ensuring the algorithm doesn’t waste too much effort on “easy wins.”
By dynamically adjusting the focus, AdaBoost homes in on difficult patterns in the data. This approach allows the algorithm to adapt and improve over time, hence the “Adaptive” part of its name.
Breaking Down the AdaBoost Algorithm Step-by-Step
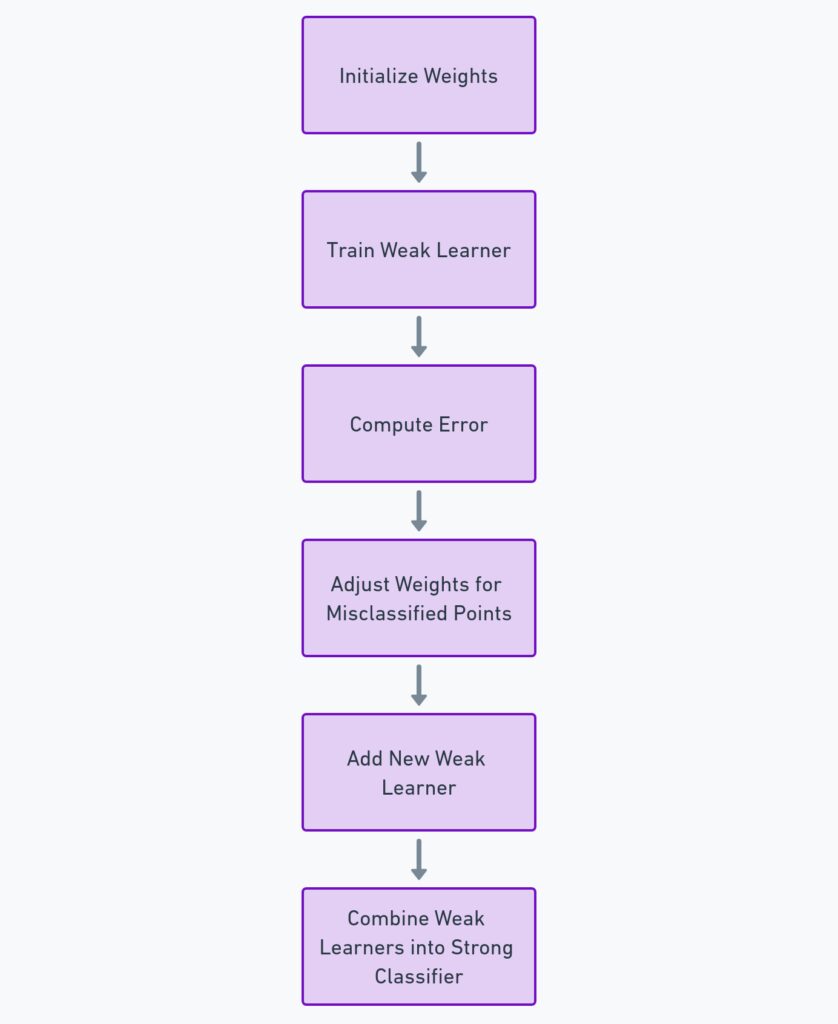
Let’s simplify the process to give you a clear picture of how AdaBoost works step-by-step:
- Initialize weights: At the start, all data points are given equal weight.
- Train weak learner: A weak learner, such as a decision stump, is trained on the dataset.
- Evaluate performance: Check how many data points the weak learner misclassified.
- Adjust weights: Increase the weights of the misclassified points and decrease the ones that were correctly classified.
- Add new learner: Train another weak learner, but now with the adjusted weights, so it focuses on the harder-to-classify data.
- Repeat: Continue this process for a set number of iterations or until the overall error rate becomes small.

By the end, you’ll have a weighted combination of weak learners that form a strong model. This combination is the final classifier that makes predictions based on a majority vote or weighted vote from all the weak learners.
Real-World Example: AdaBoost in Action
Imagine you’re trying to classify whether emails are spam or not. In the first round, a simple decision stump might focus on whether the email contains the word “free.” It may classify many emails correctly, but it misses those with more subtle patterns.
After AdaBoost adjusts the weights, the next weak learner might focus on emails with links or suspicious attachments—addressing the ones the first model missed. Each weak learner brings something new to the table, and AdaBoost adapts as it learns from each iteration.
By the time you’re done, you have a robust spam detection system that’s better than any one weak learner alone. In fact, this adaptability makes AdaBoost a favorite in many real-world applications, from fraud detection to medical diagnoses.
Visualizing AdaBoost: Decision Boundaries and Iterations
One of the most effective ways to understand AdaBoost is by visualizing how it evolves its decision boundaries over time. In the beginning, the decision boundary might look simple—perhaps a straight line that doesn’t quite capture the complexity of the data.
But as more weak learners are added, AdaBoost’s boundary becomes more refined, curving around difficult data points. Each iteration sharpens the focus, especially on misclassified examples. If you were to plot this process, you’d see how the boundary shifts and adapts, getting closer to correctly classifying all points.

Visualization also highlights why AdaBoost works well with data that’s hard to separate—its iterative approach crafts boundaries that can handle more intricate patterns than a single model.
Key Strengths of AdaBoost: When and Why to Use It
AdaBoost has several key strengths that make it a go-to choice for many machine learning tasks. First, it’s relatively simple to implement, even though it’s mathematically rigorous. You don’t need to worry about hyperparameters too much, as AdaBoost often performs well with its default settings.
It’s also highly adaptive, as the name suggests. By concentrating on hard-to-classify points, AdaBoost can often identify patterns that other algorithms might miss. This makes it particularly effective when you have a mix of easy and difficult data.
Lastly, AdaBoost is versatile. It can be used with a variety of weak learners (though decision stumps are most common), and it handles imbalanced data reasonably well. Its ability to minimize overfitting by focusing on boosting accuracy iteratively is another bonus, making it reliable in diverse applications.
Limitations of AdaBoost: What to Watch Out For
Despite its many strengths, AdaBoost is not without its limitations. One major concern is that it can be sensitive to noisy data. Because AdaBoost places higher weights on misclassified points, it might end up overemphasizing noise or outliers, which can lead to poorer performance. If your dataset contains a lot of noise, AdaBoost might aggressively focus on these errors, which reduces its overall effectiveness.
Another challenge is that AdaBoost can struggle with highly imbalanced datasets. Although it handles imbalances better than some other algorithms, if there’s a significant disproportion between the classes, you may need to apply pre-processing techniques like resampling or synthetic data generation to balance things out.
Finally, AdaBoost is generally slower to train compared to some more modern algorithms, especially when you deal with large datasets. Since it builds many weak learners iteratively, the training time can increase quickly.

AdaBoost vs Other Boosting Algorithms (XGBoost, Gradient Boosting)
AdaBoost is one of the original boosting algorithms, but it’s far from the only one. Over the years, more advanced techniques have been developed, such as Gradient Boosting and XGBoost. While they all share the same goal of turning weak learners into strong ones, they differ in key ways.
Gradient Boosting, for instance, improves upon AdaBoost by optimizing a different objective function at each step, typically minimizing a loss function. This makes it more flexible and often results in better performance. XGBoost (eXtreme Gradient Boosting) goes even further, adding advanced features like regularization and tree pruning, making it more robust and scalable for large datasets.
While AdaBoost is simpler and easier to implement, if you’re dealing with very complex data, XGBoost or Gradient Boosting may offer better performance and faster training times. However, AdaBoost still holds its own in many cases where simplicity and interpretability are important.
Use Cases: AdaBoost in Industry Applications
AdaBoost has been successfully applied across a variety of industries, thanks to its versatility and strong performance on structured data. In the finance sector, for example, it’s often used to predict credit risk or detect fraudulent transactions. Its ability to learn from misclassifications makes it ideal for fraud detection, where identifying unusual patterns is crucial.
In healthcare, AdaBoost is used to classify diseases based on patient data. It can help in tasks like diagnosing cancer from medical images or predicting patient outcomes based on historical data. The adaptability of the algorithm allows it to focus on harder-to-classify cases, which is vital in medical applications where false negatives can be critical.
Additionally, AdaBoost has found its place in marketing and customer segmentation, where it helps companies identify the most likely prospects for conversion. By focusing on customers who behave unpredictably, AdaBoost helps fine-tune targeting strategies.
How to Implement AdaBoost in Python: A Code Walkthrough
Implementing AdaBoost in Python is surprisingly straightforward thanks to libraries like scikit-learn. Here’s a basic example to show you how easy it can be to get AdaBoost running on your dataset.
from sklearn.ensemble import AdaBoostClassifier
from sklearn.tree import DecisionTreeClassifier
from sklearn.model_selection import train_test_split
from sklearn.metrics import accuracy_score

# Load your dataset
X, y = load_data()  # Replace with your dataset loading method

# Split the data into training and test sets
X_train, X_test, y_train, y_test = train_test_split(X, y, test_size=0.2)

# Initialize a decision stump as the weak learner
weak_learner = DecisionTreeClassifier(max_depth=1)

# Create the AdaBoost classifier
ada_boost = AdaBoostClassifier(base_estimator=weak_learner, n_estimators=50, learning_rate=1.0)

# Train the AdaBoost model
ada_boost.fit(X_train, y_train)

# Make predictions and evaluate
y_pred = ada_boost.predict(X_test)
print(f"Accuracy: {accuracy_score(y_test, y_pred)}")
In this example, we’re using a decision stump (a tree with max_depth=1) as the weak learner, which is common in AdaBoost. The model then runs for 50 iterations (n_estimators), adjusting weights and focusing on misclassified data points. The result is a model that improves over time and hopefully achieves a high accuracy on the test data.
You can easily adjust the number of iterations or try different weak learners to see how it affects performance.
Fine-Tuning AdaBoost: Improving Accuracy and Performance
While AdaBoost works well with minimal tuning, there are a few ways you can tweak it for better performance. One method is adjusting the learning rate, which controls how much influence each weak learner has. A smaller learning rate means each learner contributes less, so you might need more iterations, but the final model could generalize better.

Another option is modifying the base estimator. Instead of using a decision stump, you could try a deeper decision tree or even other classifiers like logistic regression. Experimenting with different weak learners can help AdaBoost perform better on different types of data.
Finally, keep an eye on overfitting, especially if you’re working with noisy data. While AdaBoost is less prone to overfitting than some other models, it can still happen if it focuses too much on noisy points. Cross-validation and early stopping can help mitigate this issue.
Visualizing AdaBoost with Python: Bringing Data to Life
One of the best ways to truly grasp the power of AdaBoost is by visualizing how it affects the decision boundaries and classification over multiple iterations. Fortunately, Python offers easy-to-use libraries like matplotlib and scikit-learn that can help you create these visualizations.
Let’s look at an example of visualizing the decision boundary for AdaBoost across multiple rounds of learning:
import numpy as np
import matplotlib.pyplot as plt
from sklearn.ensemble import AdaBoostClassifier
from sklearn.datasets import make_classification
from sklearn.tree import DecisionTreeClassifier

# Create a synthetic dataset
X, y = make_classification(n_features=2, n_informative=2, n_redundant=0, n_clusters_per_class=1, random_state=42)

# Fit the AdaBoost model
ada_boost = AdaBoostClassifier(DecisionTreeClassifier(max_depth=1), n_estimators=50)
ada_boost.fit(X, y)

# Create a mesh grid for the decision boundary visualization
x_min, x_max = X[:, 0].min() - 1, X[:, 0].max() + 1
y_min, y_max = X[:, 1].min() - 1, X[:, 1].max() + 1
xx, yy = np.meshgrid(np.arange(x_min, x_max, 0.02), np.arange(y_min, y_max, 0.02))

# Plot decision boundaries
Z = ada_boost.predict(np.c_[xx.ravel(), yy.ravel()])
Z = Z.reshape(xx.shape)
plt.contourf(xx, yy, Z, alpha=0.8)
plt.scatter(X[:, 0], X[:, 1], c=y, edgecolors='k', marker='o')
plt.title("AdaBoost Decision Boundary After 50 Iterations")
plt.show()
In this example, we generate a synthetic dataset with two features to keep the visualization simple. Then we train an AdaBoost model with 50 iterations using decision stumps as the weak learners. The contour plot displays how the decision boundary evolves to separate the data points.
As you increase the number of iterations, you’ll notice how the boundary becomes more refined and better at capturing the complex patterns in the data. Visualizations like this make it easier to understand how AdaBoost adapts over time, and you can quickly see its effectiveness in action.
Final Thoughts: AdaBoost’s Role in the Future of Machine Learning
AdaBoost has earned its place as a classic in machine learning, thanks to its simple yet powerful approach. By focusing on hard-to-classify points and improving iteratively, it offers a solution that’s still relevant today. However, while AdaBoost remains a valuable tool, modern boosting methods like XGBoost and Gradient Boosting have expanded on its principles and are often more widely used in practice.
That said, AdaBoost’s interpretability, ease of use, and ability to enhance weak models make it a great starting point for anyone diving into ensemble learning. Whether you’re building a spam filter or a medical diagnostic tool, the fundamentals of AdaBoost provide a solid foundation on which to understand more advanced algorithms.
In the evolving landscape of machine learning, AdaBoost’s adaptability will likely keep it in the conversation for years to come, especially as researchers find new ways to improve and apply boosting techniques to even more complex datasets.


